Pages

Wednesday, May 31, 2017

Revit Input Options

When entering values in parameters there are a few tricks we can use to save time... here are a few of them:

First example: You need to modify a given value (e.g. 1'-4 1/4") and don't want to do the math (too many fractions!).


Solution: turn the given value into a formula. Add an equals sign at the beginning and then subtract (in this example) the desired amount as shown in the image below.


Result: Revit evaluates the mathematical statement and returns the result.


Second Example: You are working with a manufacturer's cut sheet and the values are in metric, but you are working in imperial units (or vis versa).

Solution: Simply enter the value, including the units indicator as shown below.


Result: The metric value is translated to imperial (hard, not soft). Revit does not keep track of the original metric input.


Third Example: I know the fraction value, e.g. motor size, and I don't know/recall the decimal equivalent.


Solution: Similar to the first example, just make it a formula; enter the fraction preceded by an equals sign.


Result: The fraction is covered to a decimal based on the result of one divided by three.


One problem I ran into recently using this last trick was the result produced too many decimal places, based on Project Units, and caused a lookup table reference to fail!

Simple stuff, but little things like this can save a lot of time...


Tuesday, May 30, 2017

Free ArchVision Rendering Webinar Presented by Dan Stine

If you have any interest in general rendering techniques in Revit and beyond... consider sighting up for this free 90 minute webinar! ArchVision is hosting and I will be presenting. This will be a live presentation with 15-20 minutes for questions at the end.

  • "Revit Rendering Workflows with Dan Stine" presented by ArchVision
    Tue, Jun 6, 2017 12:00 PM - 1:30 PM CDT
    Register Now!

I will be covering materials, lighting and using RPC content to make your rendering come to life. Workflow into Enscape and Revizto will also be covered.

  • Bonus: I will also be unveiling two new "chunks" of content from ArchVision... you have to tune in to find out what they are.

The example Revit rendering below is from my Interior Design Using Autodesk Revit 2018 textbook. This example contains several ArchVision RPC families, including a custom version of me (gray vest, middle left)!


This next Revit rendering is one I did for our Minneapolis office... read this related ArchVision blog post: LHB Minneapolis Office Renderings Submitted for LEED® CI Platinum. FYI: This is an old post, LHB was awarded the LEED certification!


Although this is geared towards beginners, I will be covering a few cool tips and tricks that even experienced users might not know (or remember:)).

The best part is ArchVision is offering this presentation for free!

Monday, May 29, 2017

You Know VR is for Fun Too, Right?

As the AEC community begins to embrace Virtual Reality (VR) to to aid in the design process and project presentations, we don't want to forget we can have some fun with it too...

Our firm's Events Committee tries to weave in several social events throughout the year to keep things interesting. Over the years we have had Mario Kart and pinewood derby competitions, as well as bean bag tossing and family gatherings.

Next week we will have a little fun in the LHB VR Lounge (see image below). We will be playing the VR archery game in NVIDIA's VR Funhouse game. The HTC Vive also comes with a fun archery game, in The Lab, but the the VR Funhouse one has a countdown and keeps score.

LHB VR Lounge - Duluth Office
Here are two images from this game. There are several targets to shoot at and some are moving. You can start the tip of your arrow on fire, which then starts the target on fire as well. If you run out of arrows, you can pull more from your quiver (a hidden bonus:)).


Here is the invite that went out to staff...

More on NVIDIA VR Funhouse

In addition to the NVIDIA VR Funhouse game being really fun, and a good workout, there is a lot of super cool stuff happening under-the-hood... which is intended to show off the features built-in to the hardware. Using these features significantly improves performance... similar to calling functions built-in to the CPU.

NVIDIA blog post: Our First Virtual Reality Experience, VR Funhouse, Shows What Pascal Can Do for VR

The bullet points from this blog post highlight the NVIDIA supported Pascal features:

  • NVIDIA Flow — Grab a bow and arrow in our target-shooting mini-game. Set the arrow aflame and you’ll be able to shoot it at targets that burst into flames when they’re hit. Our NVIDIA Flow technology physically simulates experiences such as fire throughout VR Funhouse.
  • NVIDIA HairWorks — The whimsical feel of our colorful “Whack-a-Mole” and “Mole Boxing” challenges is enhanced by NVIDIA HairWorks technology. Jab at your targets. Give them a knock and you’ll see their colorful hair bounce. Or pat them on the head to flatten their jazzy haircuts.
  • PhysX for VR — Poke, punch, pound and explore. VR Funhouse is filled with objects that you can interact with in surprising ways using your hand controllers. Our PhysX for VR technology gives the objects in the game realistic physical behavior, enabling proper graphics, collision detection, and haptics force feedback.
  • NVIDIA FleX — In our “Wallwalker Toss” mini-game, you’ll be able to pick up gooey, colorful blobs — that stretch and jiggle in surprising ways in your hand — toss them at targets and watch them ooze toward the ground. You’ll find this next-generation particle-based physical simulation used all over VR Funhouse.
  • NVIDIA VRWorks Audio — Walk into “Crown Creeper,” and you’ll need to use your ears to locate a stealthy drone. VRWorks Audio uses our Pascal GPUs to ray trace sound waves in real-time, realistically simulating how audio propagates and reflects across the room.  The reflections and echoes created by VRWorks Audio will test your skills in locating the drone.
  • VR SLI — The more, the merrier. If you’ve got two GPUs, this technology will let one GPU render images to your left eye, and the other to your right, maximizing performance and minimizing latency.

We have several GeForce consumer "gaming" cards (e.g. 1080 and two SLI'ed 1070s), but this game also works great on our Pascal-based Quadro P5000 graphics card. I previously wrote about the P5000 graphics card; NVIDIA Quadro P5000 for AEC VR; Best Architectural Experience Yet.

If interested, here are two more related links:
NVIDIA Blog post: Why We Made the World’s Most Advanced VR Game – NVIDIA VR Funhouse
NVIDIA Product Overview: NVIDIA VR Funhouse

Oh, and this "let's show what a VR game can do on our hardware" VR game is FREE!

Thursday, May 25, 2017

Family Type Formula Tips

Slow blogging week as I am in Knoxville, where my son is competing in Global Finals for Destination Imagination (DI) this week. DI is something like a cross between science fair and drama club... and culminates with Global Finals, which includes 15+ countries, 1,400+ teams and over 8,000 students.


As architects, engineers and designers we need to work with a lot of data in today's complex building design projects. I want to share a few tips about managing element type data in Autodesk Revit.

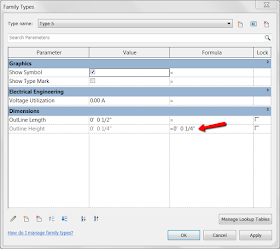
Notice in the image below there are several types. I have worked on families with many, many more. If we create a parameter, or want to change an existing parameter, it can be time consuming. Before I figured out a few tricks, I found myself changing the Type name drop-down, editing the Value and then repeating until all the types had been changed.


In the example below, I want to uncheck Show Type Mark for all types. Currently, some may be on and some off.


One way to quickly achieve this is to temporarily enter a Formula. In this case I know Show Symbol is currently checked for all types, so I entered the formula not(Show Symbol). This unchecked Show Type Mark for all types. To finish, apply and then delete the formula.


This would not have worked if Show Symbol had some types unchecked. In this case, I could create an IF statement to handle this... however, they can be a little tricky for Yes/No parameters.

We can use any length parameter (I use Outline Height in this example) and see if it is greater than, or equal to, a certain value that will always produce a false result.

A first attempt might look like this:

  • if(Outline Height > -1', 0, 0)


However, Yes/No does not equate to 0 or 1, or True or False, in a formula.

Per a previous post from Steve Stafford, this does work:
  • if(Outline Height > -1', 0 = 1, 0 = 1)

This technique could also be used if you still needed one or two types checked; turn everything off and then check the required ones individually. Similar to the Filter dialog; selecting Check None to quickly clear the list and then individually checking the few needed.

Another example of using this trick is when you want to change one of the length parameters, for every type, shown in the previous image. Simply type in the desired length in the Formula column, apply it and then clear the formula. The length has been reset for every type.


Finally, if the family name is specific then the related parameters should not be editable. For example, if the family name is 480V Water Heater, then all types in that family should be hard-wired to 480V as shown below. This formula would be left in place, not deleted, so the designer cannot possibly change it in the project environment.


We can also use Revit schedules to accomplish some of this, but I will save that for a future post.

Feel free to share some of your related tips in the comments.


Monday, May 22, 2017

SketchUp to VR with Revizto

For those within, and around, the Revit ecosystem, you may not know that Revizto supports SketchUp as well. As you can see in the screen grab below, from the Revizto website, they support a number of applications and file formats.


When Revizto is installed, and SketchUp is present on your system, it will add the SketchUp plug-in. Once installed, simply open a Sketchup model and click the export to Revizto command. From there you have access to the model in Revizto and.... the reason for this post... quick access the a virtual reality experience within a SketchUp model!

The two images below are from a large multi-building, landscape architecture (LA) and civil project we collaborated on a few years ago (SU model created by our LA group). A larger overall image of this project can be seen on LHB's website, if interested: The Promenade of Wayzata.


Notice the hand colored, with markers, ground surface image came into Revit. Not that it is hard to navigate a SketchUp model, but you can use all of the familiar navigation techniques in Revizto to get around the model.

  • For navigation, I love the 3D Connexion mouse. Last year I was able to get 3D Connexion to provide their 3D mice for my lab at RTC in Australia!


With the SketchUp model now exported to Revizto, we can open the model in VR... using the Oculus Rift or the HTC Vive. The image below is NDSU grad, Areosmith fan, and LHB'er Carolyn Stevens buzzing around a model using the Oculus.


I will close this post with a "homemade" video I created in 1-2 days. I have some practice as I create videos for my AutoCAD and Revit textbooks. Did you know I even have a SketchUp book (but it does not cover VR)?


Anyway, here is a video we never really ended up using due to audio quality... but towards the end it shows the SketchUp model in Revizto. Project Principal Aaron Kelly is also seen at the end of the video giving an unscripted plug for VR at LHB!


That's all...

Sunday, May 21, 2017

Revit Idea: Change how wire is auto-sized or allow override for engineering judgement

Please vote for this on Revit Ideas: Change how wire is auto-sized or allow override for engineering judgement

Here is what I wrote there:

Revit, in some cases, cannot properly calculate voltage drop due to how it automatically assigns wire size. Here is a brief description on this issue from the user guide of the Electrical Productivity Pack from Cad Technology Center that I helped to create. 

  • The method that Revit uses to assign wire sizes is to first select the rating (OPD) for the circuit, then Revit hard links the wire size to the rating of the circuit. This is unworkable, because it does not allow for adjustments for wire sizes independent from the OPD rating. It is not possible to increase wire size for voltage drop without changing the OPD rating, nor is it possible to increase the OPD rating for motor starting without also increasing the wire size.
  • Revit is backwards, the wire size should be selected based on the load first. Then the OPD should be selected for correct ampacity. NEC (National Electric Code in USA) may allow next standard OPD size to be used without increasing the wire size. However, this is not always permitted; i.e. a 53 A load may use conductors rated at 55 A and OPD at 60 A; but a 58 A load would require the next larger size conductor and perhaps the same 60 A OPD. Revit does not allow this flexibility.

I am glad we can edit circuit path in 2018, this is a big step in solving the issue of voltage drop and wire size. I talk about this in my 'What's New in Revit 2018" article for AECbytes.

In addition to what I had posted above... wire sizes are “hard coded” to the ampacity of the upstream OPD.  Revit calls this “Rating”.  Revit will automatically select the wire size defined in Manage > MEP Settings > Electrical Settings > Wire Sizes (see image below); ampacity equal to or the next size larger than the “Rating” (OPD) of the circuit.


Until this limitation is addressed, we are forced to totally ignore Revit's wire sizes and use a Key Schedule to manually document this in the electrical equipment schedule. It is not possible to partially use this information in schedules as we cannot override this information.

I previously touched on this limitation in my AECbytes article: What's New in Revit 2018.

I do not believe this is just a problem in the United States. But even if it is, we need to be able to control this to create code compliant electrical designs... like how stairs have two fundamental ways in which Revit can calculate the tread and riser height; 1) Max. riser & Min. Tread and 2) Stair Calculator dialog (I have never used the latter method).

Fun stuff! Thanks for reading.

Saturday, May 20, 2017

Duplicate a Revit Material and its Asset

This is literally a page out of a book.,, my Interior Design using Autodesk Revit 2018 book.

Duplicating a Material and its assets:
It is important to know how to properly duplicate a Material in your model so you do not unintentionally affect another Material.

If you Duplicate a Material in your model, the Appearance Asset will be associated to the new Material AND the Material you copied it from! For example, in Figure 4-2.18, we will right-click on Carpet (1) and duplicate it. Before we duplicate it, notice the Appearance Asset named “RED” is not shared (arrow #3 Figure 4-2.18).
Figure 4-2.18 Duplicating a material
Once you have duplicated a Material, notice the two carpet materials, in this example, now indicate they both share the same Appearance Asset. Changing one will affect the other. Click the Duplicate this asset icon in the upper right (Figure 4-2.19).

Figure 4-2.19 Duplicating an asset
Finally, when the Appearance Asset has been duplicated (Figure 4-2.20), you can expand the information section and rename the asset. You can now make changes to this material without affecting other materials. This applies to all assets in a Material.

Figure 4-2.20 Renaming an asset
[end... a page out a book]

Duplicate Material and Assets Revit Idea

On Revit Ideas, I submitted an idea to allow us to duplicate a material and its asset. Here is what I wrote:

  • While in the Material Editor, in addition to Duplicate it would be helpful to have another option; Duplicate Material AND Assets. Maybe an intermediate dialog appears to prompt (with check boxes) for which assets (Appearance, Physical, Thermal) to duplicate. Often, we duplicate a material and then have to immediately, manually, duplicate the appearance asset so the original material does not get messed up.
This could be similar to the options we have when right-clicking and duplicating a view (duplicate, w/ detailing, dependent). As an instructor and Revit support person in a multi-discipline firm, I find a lot of people do not know about the need to duplicate the asset, or they forget and accidentally mess up other materials.

To vote this one up, click here: Duplicate Material and Assets


Random Microsoft Word Tip

I wanted to get the three Revit material dialog images above out of my book for this post. Did you know you can simply rename a Word docx file to a zip and and then just double-click on it?

Every image used in the document is now listed here. They can be viewed, as in the example below, or select them all and copy to another folder!


That's all for today... thanks for reading.

Friday, May 19, 2017

Brick Material and Assets Library in Revit

I few years ago I had an intern create a Revit material and asset library based on a brick manufacture's specs and images. A few of them are not very good due to the small sample area of the image, which creates an unpleasantly distinct repeating pattern, and a few of them do not repeat very well. However, it is a good example of how one might create a custom library for materials AND assets; the later will be the more interesting discussion here.

  • FYI: I also spent some time talking about this in my top rated Mastering Materials in Revit session at RTC-Asia 2015 (now BILT) in Singapore.


Here is a quick look at the materials in a Revit project (click to enlarge).

The next three images show the material definition for one of the brick materials.

Identity tab includes information about the product and a URL link for more information on the supplier/manufacturer's website.


The Graphics tab has the shading color defined by the Render Appearance and the Surface Pattern matches the brick size/pattern.


The Appearance tab defines the realistic/rendering/VR texture. Notice this is a "Masonry" material asset type and it has two images assigned. In this case, the surface pattern is a Posterized version of the original image file and the joints have been made completely solid. This step creates a little more distinction in the relief. It is perfectly fine to just use the original material as the relief (I do it often).

  • FYI:  I have noticed, that somethings the advanced materials get washed out in Enscape. In this case, this should be changed to a "Generic" material.


I do not recall why the Finish is set to Glossy. Below is a close up view of the material. The white highlights are related to the glossy setting and the current sun position in the view.


Clicking on the image swatch opens the Texture Editor. Here is where the size of the texture is defined (i.e. Scale parameters). This is also where the material is set to Repeat vertically and horizontally.

The same values are entered for the Relief Pattern image.


The Material Browser has an icon in the lower left which allows you to create a new material library or open an existing one. For the brick material library I simply created a new library, which involved providing a name and location for the ADSKLIB file.
I placed all the image files (textures) in a folder along with the ADSKLIB file on the server so everyone has access to it.


Anyone using these materials will need to add this path to the Additional Render Appearance Paths in Revit's Options dialog. If this is not done, the material will be gray. These special paths can be incorporated into a deployment. I have several in my deployment; for brick, Herman Miller, Haworth, etc.


Anyone who needs access to this library can use the Open Existing Library option in the Material Browser dialog (shown previously). Make sure the File of type is set to ADSKLIB (not structural property set).


Once loaded, the new library is listed in the Library Panel as shown below. Materials can be loaded into the current project, just like you do with the Autodesk provided materials. Unless the custom library is in a read-only folder, project materials can be dragged into the custom library as well.


When a material is saved to a custom material library, it includes the main material and its assets (i.e. appearance, thermal, structural). Sometimes, we just want to change a brick material already defined in the project; because it is used by several walls, families, etc. In this case, it is easier to modify the existing material.

It is possible to replace a material's asset with another one...


In the Asset Browser, we can also load the custom material library. This gives us direct access to the appearance assets associated with the main materials as shown below.

If needed, the material assets can be modified apart from the main material. This may not need to be done very often, at least in this example. However, when you need to do it, the process is not very intuitive. From the Manage tab, select Additional Settings and then Materials Assets.


When both the Asset Editor and the Material Browser are open, double-click on a material to load its settings into the adjacent Asset Editor dialog as shown below.


This is a little bit of a tangled web, but getting a handle on this will make the design process and visualization efforts a little more efficient!