
Revit has the ability to calculate the area of a room automatically. This is super helpful, but can be limiting at times. Today's post highlights the basics of how this works.

Keep reading to learn more...
First, to see the rooms clearly, we can turn on the Interior Fill and Reference sub-categories. Normally, these are only seen while using the Room (or Space) command.
Next, let's look at the Area and Volume Computations dialog, found on the Architecture tab, in the expanded Room & Area section as shown below.

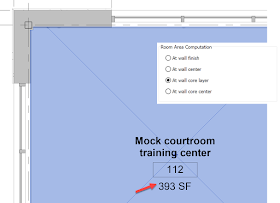
Here, there are four options for controlling room area computations...

The default is usually set to At wall face... resulting in the net area of a room. Another useful option is At wall center, which results in the gross area of a room, with one big exception; unfortunately, the area of half of all the exterior walls are not included in the gross area.

I have never found a need to use the other two options, which define the room's area relative to a wall's Core Boundary. Notice, in this example below, the area extends past the interior finish to the face of the structural component of the wall.
To be clear, here is the wall type, showing how the "At wall core layer" relates to the Core Boundary.

Lots more to say on this topic, but that will be done in future posts.
Check out Part II here: Revit Room Area Basics - Part II
For BIM Chapters updates, follow @DanStine_MN on Twitter or connect on LinkedIn
Check out my video-based courses on ArchSmarter.
I also write blog posts for Enscape - a new paradigm in rendering, animation and VR for AEC.

Keep reading to learn more...
First, to see the rooms clearly, we can turn on the Interior Fill and Reference sub-categories. Normally, these are only seen while using the Room (or Space) command.
Next, let's look at the Area and Volume Computations dialog, found on the Architecture tab, in the expanded Room & Area section as shown below.

Here, there are four options for controlling room area computations...

The default is usually set to At wall face... resulting in the net area of a room. Another useful option is At wall center, which results in the gross area of a room, with one big exception; unfortunately, the area of half of all the exterior walls are not included in the gross area.

I have never found a need to use the other two options, which define the room's area relative to a wall's Core Boundary. Notice, in this example below, the area extends past the interior finish to the face of the structural component of the wall.

To be clear, here is the wall type, showing how the "At wall core layer" relates to the Core Boundary.

Lots more to say on this topic, but that will be done in future posts.
Check out Part II here: Revit Room Area Basics - Part II
For BIM Chapters updates, follow @DanStine_MN on Twitter or connect on LinkedIn
Check out my video-based courses on ArchSmarter.
I also write blog posts for Enscape - a new paradigm in rendering, animation and VR for AEC.