Showing posts with label Bind. Show all posts

Monday, May 15, 2017

Binding Revit Links - Part 2

Today's post will consist of a few comments about binding Revit links with Grids and Levels.

If your linked model had Grids, it is usually a good idea to bring them in if the host model does not already have them. On the other hand, I usually avoid checking the Levels option.


I like to make sure the host model has all the levels the link model has AND those levels are at the same elevation. They don't need to have the same name, they just need to be at the same elevation. This way, when you bind a link, all the level-hosted elements (which, directly or indirectly, ends up being everything) will reference the levels in the host which are at the same elevation in the linked model.

Here is what happens when you don't follow this advice...

We select a Revit link, click Bind on the Ribbon and check Levels. Next, we select the newly created Group (which used to be the linked model) and click Ungroup on the Ribbon as shown below.


The previously linked/grouped model is now part of the current Revit project. If you applied Attached Details per the previous post, all the annotation is also ungrouped and now directly editable.

Switching to a section or elevation view, we see the levels from the link are now overlapping the levels from the host model. Revit renamed the newly bound levels, which is messy. But what's worse, is there are now multiple levels at the same elevation. This is bad, really bad...


At some point, someone on the project will realize this oversight and will want to "clean house" and delete the extra levels. However, when a level is deleted, Revit quietly deletes all the elements associated with it. I say "quietly" because there is no warnings and, depending on the current view, you may not see anything disappear.

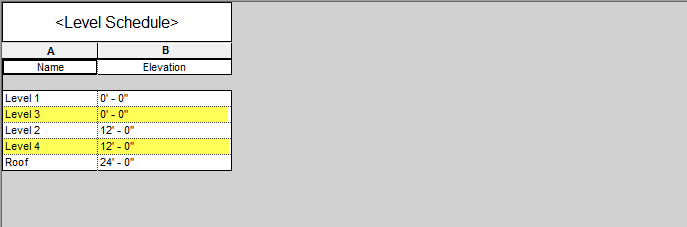
In the image below, I created a schedule to see all the levels in the project. Notice the elevations are the same for some. Again, this is bad and difficult to fix as there is no built-in Revit tool to selected all elements based on which level they are associated with (there are ways to do it, just not built-in).


Another problem one might run into with levels, when binding a Revit link, is if the host levels are not at the same elevation; in this case, the Levels option is not checked while binding. In this case, an element that was associated with Level 2 may now be associated with level 1 and have an odd Offset applied. This is another messy thing to try and correct.

One thing to keep in mind when bringing in grids from a linked model, is that a grid cannot have the same number or letter as another grid. Thus, Revit renames the "new" grids as shown below; the "4" grid was "1" in the linked model.


In summary...

  • Only check Attached Detail if you need the annotation from the link.
  • Bringing in the Grids is generally a good idea, but make sure there are no duplicate numbers/letter in the host model.
  • Make sure the host model has the same Levels AND they are at the same elevations; make new levels in the host model as needed.

The next post will discuss challenges associated with binding Revit models with phasing. Please stay tuned...

Sunday, May 14, 2017

Binding Revit Links - Part 1

There are a number of interesting things about binding Revit links worth posting about. This first one will be on the three options we have in the Bind Link Options dialog, Especially the first one, Attached Details, seeing as it is checked by default. I find a lot of people don't know what this does.


Backing up a minute, before we talk about binding Revit links, the next three images are from the model I will be linking in and be binding into another Revit model.

Level 1 floor plan view with grids, notes, tags and dimensions.

Level 1 - Code Plan is a second Level 1 plan view with a different variety of tags, notes and dimensions.

Level 1 ceiling plan with room tags, text notes and a few spot elevations.


When a Revit model is linked into another Revit model, by default we only see the model elements, grids and levels as shown in the image below; this shows the model above, linked into another model and it is currently selected.


With the link selected, click Bind on the Ribbon. In this example I will select all three options.


Once the model is bound, it becomes a Group. Select the Group and then click the Attached Detail Groups button on the Ribbon.


Notice there is an item for each view that had annotation in the linked Revit model. While we are in the Level 1 floor plan, let's select Floor Plan: Level 1 and see what happens.


The result is that all the annotation from the Level 1 view, in the original linked model, has been added to the current view. Two things to notice: 1) the section is missing, which is another view, and 2) the wall type lost it's type mark because the host model already had that wall type.


Let's switch to the reflected ceiling plan view and do the same thing...


The result is all the annotation, including the spot elevations and room tags have been added to the view.


We can also do this for the code plan view. In this example, the view name in the host model does not match the original view name in the linked model. The view name does not matter. Thus, we can add the annotation to any view, there just needs to be something to host things like dimensions and tags.


Here is the result in the other Level 1 floor plan view.


The attached detail groups can be found in the Project Browser as shown here.


If you don't need the annotation from the linked model, then don't check the Attached Details option while binding - this will make the host file a little larger as well. If you need all the annotation from the various view, then check the box. Once you Bind and Ungourp be sure to remove the link and delete the Group from the Project Browser to clean house in the host model.

Stay tuned for more on binding links; managing levels and what happens when the linked model has phases.