Showing posts with label Materials. Show all posts

Tuesday, March 12, 2024

Managing Custom Materials for Enscape

My latest post is live over on the Ensacpe blog!

It highlights the steps to transfer materials between Enscape-supported modeling platforms like Revit, SketchUp, Rhino, and more. It also provides some deployment and management tips for multi-user firms.


keep reading to learn more...

Thursday, March 31, 2022

Converting a Revit Material to Generic

Revit has multiple material types (aka shaders) which have been added over the years. Generally speaking, we have Generic, Physical Based, and most recently Advanced.

Although I like the advanced (PBR) materials, they are not supported in Enscape very well. Plus, there are things you can do with Generic materials you cannot do with the newer ones (tint, cutout). Today's post will show a rather hidden command to convert a material to the Generic shader.


keep reading to learn more...

Wednesday, December 22, 2021

Revit Ideas - Revit Materials Hosted in BIM 360 - Added to Roadmap

Happy to see Autodesk has added the ability to host shared appearance asset resources in BIM 360 to their public roadmap.


keep reading to learn more...

Tuesday, July 21, 2020

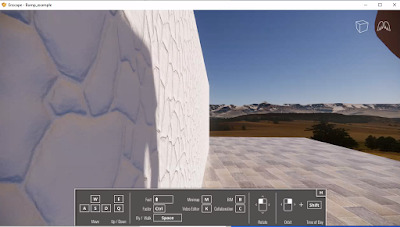
Material Bump Basics for Enscape

Using bump maps in a material definition is key to quality visualizations with Enscape, or any rending engine. A quick post today with a tip on making sure the bump map is doing what you want, and not creating the opposite effect.


keep reading to learn more...

Tuesday, July 16, 2019

Revit Advanced Materials - Base Material Templates

The new Revit advanced materials are based on PBR shaders, which is what modern rendering engines utilize. Understanding all the related options in Revit can be a bit challenging, as there is no easy way to switch between appearance assets in Revit (watch the comments below for a link to a Revit Idea on this from my good friend Pieter:)).

In this post I will share a fundamental tip in understanding this newer option in Revit. It has to do with the provided "base material" templates...


keep reading to learn more...

Wednesday, June 27, 2018

Revit 2019 Advanced Materials work in 2017 and 2018

A quick post to point out that the new Advanced Materials which ship with Revit 2019 work in Revit 2017 and 2018. I believe they basically worked since the Autodesk Raytrace rendering engine replaced the NVIDIA Mental Ray engine... we just had no way to "flip the switch" to get this new shader to activate (that I know of).


As you can see in the image above and below, the advanced materials...

Friday, June 22, 2018

Material Schedules and Custom Material Properties in Revit

Revit's materials can be used to track finishes in a more formal way, such that they are used in the bidding documents. There are many challenges related to utilizing this workflow, but this post will focus on the mechanics of creating materials with all the information an architect or interior designer might want to tabulate.

The first thing to do is create any custom parameters. The trick here is that you are creating a parameter associated with materials, not a "material parameter" as shown in the image below.

If you create a material with Type of Material set to Material you can only select material names from a list. If you create a Text parameter associated with the material category, then you can type whatever you want in that text-based parameter. TIP: Add a tooltip to your custom parameters to help other designers in the office.


Accessing the custom material parameters is not very intuitive, but this does not really matter as...

Monday, December 18, 2017

Revit® Materials - Appearance Images

Here is an older tip I posted on LinkedIn a year and a half ago, and thought I would copy it over to my blog...

When a design team is developing a Revit model and materials are being applied, everyone needs to make sure they understand a few things about the process to ensure success! I want to share a problem that comes up occasionally and discuss the solution.

The Problem
When someone starts a rendering, either locally or in the cloud, Revit will...

Tuesday, June 20, 2017

Render Appearance Search Path

The problem with using content downloaded from the internet is that families do not contain any of the textures, aka image files or render appearance images, used in the materials. This becomes evident when you render and see a list of missing render appearance images as shown in the image below.
That textures are also missing is evident by the exclamation mark symbol in the Material dialog. Notice the image preview area, in the image below, is bright red with this attention getting symbol.
Some manufactures, such as Herman Miller, offer a download link for their materials/textures. However, this is really only useful for the materials already defined in the family. With furniture, for example, there are lots of material options. The definition of the material is more than just the texture itself; image scale, cutouts, reflections, etc. To help with this challenge, Herman Miller also offers a Revit Material Library as shown in the image from their website below.

  • I wish more manufacturers would offer Material libraries; some don't even offer the texture files.

The image files can be saved to a common folder on your network. An important step to make sure the materials see the appearance textures, is to specify the path via Options as shown below. This is also important to set, so the materials are found when rendering; Revit does not just search your hand drive and entire network looking for these missing item; and your location is not likely to be the same as the folks from Herman Miller who made the content.
Once the path is set properly, Revit should be able to find the textures. In the image below, notice the texture size and cutout information are part of what define the material... not just the image file itself. Also, some manufactures even fill out the Identity tab information. The Herman Miller Material Library does not appear to add the identity information; which is a missed marketing opportunity.
My book, Interior Design using Autodesk Revit 2018, touches on the use of content and textures from manufactures.

There is a lot more to say on this subject, but that will be for future posts.

Wednesday, June 14, 2017

Revit Material: Material Name in a Family

How can we easily share materials between families? There are a few different ways to approach this depending on your needs. One is to create a custom material library, another is to use Transfer Project Standards.

If the Material is already setup in the project environment, it will NOT be changed when loading families with the same materials. Revit assumes the project is correct and will not change that material every time a family is loaded. With that knowledge, all you really have to do is make a dummy material with the correct name, load it into a project with the correct material (i.e. identity, graphics, appearance, etc. settings) and then open that family for editing. Now you have a family with the same settings.

On a related note, one could also use the Revit Family Processor (by CTC Express Tools) to quickly add, delete or change Materials in several families at once. This has some limitations (due to the API as I understand it) but can definitely help. The image below shows how one might add a Material name (LHB Maple in this example) to several families.

  • FYI: The Family Processor is a great way to get rid of all the default Materials loaded in your content (which came from the family templates).


Tuesday, June 13, 2017

Image Defines Transparency in Revit Material

Quick post today... an image file can be used to define a transparency in a render appearance asset as shown in the first image below. This could represent an etched or vinyl pattern on glass.

The lighter areas of the image are more transparent than the darker areas. Click on the image preview to adjust the size of the image (i.e. the pattern on the glass).

The result can be seen in this 3D view from a healthcare project...

Monday, June 12, 2017

Creating a Fence Material and Finding Local Assets

When you need a new material, searching the project and Autodesk libraries is the best place to start (see image below). Sometimes a material does not exist, as in this “fence” example, but an Appearance Asset does; which will get you part of the way there.
Searching for a material
Searching the Asset library reveals a chain-link fence option.
Searching for an asset
When this asset is loaded into a Material, it contains several settings, such as image size, cutout and Bump.
Adding a cutout image for a chain-link fence material
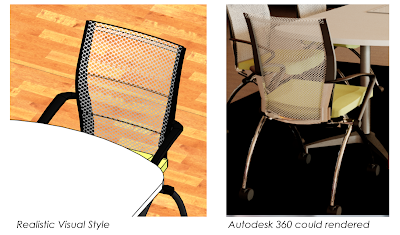
The image below shows the images used to create a fence render appearance (visible in realistic and rendered views). For these images, I did a Google “Images” search and quickly found a tillable image of a fence. Then I made a copy of the image, edited it in Photoshop to look like the second image below (which took about one minute), and then assigned this image as the “cutout” on the Appearance tab. The black areas in the cutout image are the transparent portions as seen in the rendered image on the right.
Combining main image and coutout image to produce result shown on right
For the fence example, you would still need to manually add the Identify and Graphics information manually. For example, the surface pattern and Texture Alignment (to make the drafting views and rendered views align).

Another cutout example...
Back rest mesh material: cutout: Furnishings.Fabrics.Netting.Mask.jpg

Surface pattern texture alignment
Another thing you can do is search the materials and textures folders on the hard drive. The image below shows the results from searching for “fencing” at this location (in Windows Explorer): C:\Program Files (x86)\Common Files\Autodesk Shared\Materials

As you can see there are several “fence” options not revealed in our previous searches (discussed above).
Searching the materials folder via windows explorer
  • TIP: Switch to thumbnail preview mode to see the images.
You can even search in the Revit dialog’s as shown below.
Searching within the Revit open/load dialog


Saturday, May 20, 2017

Duplicate a Revit Material and its Asset

This is literally a page out of a book.,, my Interior Design using Autodesk Revit 2018 book.

Duplicating a Material and its assets:
It is important to know how to properly duplicate a Material in your model so you do not unintentionally affect another Material.

If you Duplicate a Material in your model, the Appearance Asset will be associated to the new Material AND the Material you copied it from! For example, in Figure 4-2.18, we will right-click on Carpet (1) and duplicate it. Before we duplicate it, notice the Appearance Asset named “RED” is not shared (arrow #3 Figure 4-2.18).
Figure 4-2.18 Duplicating a material
Once you have duplicated a Material, notice the two carpet materials, in this example, now indicate they both share the same Appearance Asset. Changing one will affect the other. Click the Duplicate this asset icon in the upper right (Figure 4-2.19).

Figure 4-2.19 Duplicating an asset
Finally, when the Appearance Asset has been duplicated (Figure 4-2.20), you can expand the information section and rename the asset. You can now make changes to this material without affecting other materials. This applies to all assets in a Material.

Figure 4-2.20 Renaming an asset
[end... a page out a book]

Duplicate Material and Assets Revit Idea

On Revit Ideas, I submitted an idea to allow us to duplicate a material and its asset. Here is what I wrote:

  • While in the Material Editor, in addition to Duplicate it would be helpful to have another option; Duplicate Material AND Assets. Maybe an intermediate dialog appears to prompt (with check boxes) for which assets (Appearance, Physical, Thermal) to duplicate. Often, we duplicate a material and then have to immediately, manually, duplicate the appearance asset so the original material does not get messed up.
This could be similar to the options we have when right-clicking and duplicating a view (duplicate, w/ detailing, dependent). As an instructor and Revit support person in a multi-discipline firm, I find a lot of people do not know about the need to duplicate the asset, or they forget and accidentally mess up other materials.

To vote this one up, click here: Duplicate Material and Assets


Random Microsoft Word Tip

I wanted to get the three Revit material dialog images above out of my book for this post. Did you know you can simply rename a Word docx file to a zip and and then just double-click on it?

Every image used in the document is now listed here. They can be viewed, as in the example below, or select them all and copy to another folder!


That's all for today... thanks for reading.

Friday, May 19, 2017

Brick Material and Assets Library in Revit

I few years ago I had an intern create a Revit material and asset library based on a brick manufacture's specs and images. A few of them are not very good due to the small sample area of the image, which creates an unpleasantly distinct repeating pattern, and a few of them do not repeat very well. However, it is a good example of how one might create a custom library for materials AND assets; the later will be the more interesting discussion here.

  • FYI: I also spent some time talking about this in my top rated Mastering Materials in Revit session at RTC-Asia 2015 (now BILT) in Singapore.


Here is a quick look at the materials in a Revit project (click to enlarge).

The next three images show the material definition for one of the brick materials.

Identity tab includes information about the product and a URL link for more information on the supplier/manufacturer's website.


The Graphics tab has the shading color defined by the Render Appearance and the Surface Pattern matches the brick size/pattern.


The Appearance tab defines the realistic/rendering/VR texture. Notice this is a "Masonry" material asset type and it has two images assigned. In this case, the surface pattern is a Posterized version of the original image file and the joints have been made completely solid. This step creates a little more distinction in the relief. It is perfectly fine to just use the original material as the relief (I do it often).

  • FYI:  I have noticed, that somethings the advanced materials get washed out in Enscape. In this case, this should be changed to a "Generic" material.


I do not recall why the Finish is set to Glossy. Below is a close up view of the material. The white highlights are related to the glossy setting and the current sun position in the view.


Clicking on the image swatch opens the Texture Editor. Here is where the size of the texture is defined (i.e. Scale parameters). This is also where the material is set to Repeat vertically and horizontally.

The same values are entered for the Relief Pattern image.


The Material Browser has an icon in the lower left which allows you to create a new material library or open an existing one. For the brick material library I simply created a new library, which involved providing a name and location for the ADSKLIB file.
I placed all the image files (textures) in a folder along with the ADSKLIB file on the server so everyone has access to it.


Anyone using these materials will need to add this path to the Additional Render Appearance Paths in Revit's Options dialog. If this is not done, the material will be gray. These special paths can be incorporated into a deployment. I have several in my deployment; for brick, Herman Miller, Haworth, etc.


Anyone who needs access to this library can use the Open Existing Library option in the Material Browser dialog (shown previously). Make sure the File of type is set to ADSKLIB (not structural property set).


Once loaded, the new library is listed in the Library Panel as shown below. Materials can be loaded into the current project, just like you do with the Autodesk provided materials. Unless the custom library is in a read-only folder, project materials can be dragged into the custom library as well.


When a material is saved to a custom material library, it includes the main material and its assets (i.e. appearance, thermal, structural). Sometimes, we just want to change a brick material already defined in the project; because it is used by several walls, families, etc. In this case, it is easier to modify the existing material.

It is possible to replace a material's asset with another one...


In the Asset Browser, we can also load the custom material library. This gives us direct access to the appearance assets associated with the main materials as shown below.

If needed, the material assets can be modified apart from the main material. This may not need to be done very often, at least in this example. However, when you need to do it, the process is not very intuitive. From the Manage tab, select Additional Settings and then Materials Assets.


When both the Asset Editor and the Material Browser are open, double-click on a material to load its settings into the adjacent Asset Editor dialog as shown below.


This is a little bit of a tangled web, but getting a handle on this will make the design process and visualization efforts a little more efficient!

Friday, May 12, 2017

Great Revit Materials Tips for Enscape by Phil Read


Check out this series of posts about Revit materials by Phil Read. Even if you don't use Enscape, there are some great tips here! The image above is from one of these posts. Nice work!

Self Illumination in Revit? Booooring. Neon Lighting in Enscape? Cool!

Three Steps to Beautiful and Natural Looking Materials in Revit and Enscape

Graphics for Signage, Set Dressing and Entourage in Revit and Enscape

  • From this last post: "Here's a great tip from book writing, sandal wearing, winter bike riding, Revit guru Dan Stine! Use the Paint Tool to assign a material as a parameter." Thanks Phil:)
  • Details on this tip can be found here: Revit Materials; Painting a Material Parameter

I had posted a similar, up close and personal, image on a LinkedIn post a while back... this is also from Enscape. Link to post.


Enjoy!