Friday, March 31, 2017

Autodesk Revit's "Secret" Backup Location

FYI: I am moving a few old posts from LinkedIn to this blog, so some of you may have seen this one previously. Also, some of these posts are meant to supplement my textbooks for students just learning Revit. For example, in this post I define what 'worksharing' is.

When a Revit family or project file is located in a network location, and does not have worksharing enabled, Revit will save a backup copy of the file in your Journal folder on your local drive--usually your C: drive.

  • Worksharing is a feature that can be enabled on a Revit project file so multiple designers can work in the same file at the same time.

The journal folder is located here:
C:\Users\djs\AppData\Local\Autodesk\Revit\Autodesk Revit 2016\Journals

  • Change out the bold items for your username and Revit version.


Here is a related quote from Revit Help: "[Revit] Makes a backup copy of the saved file, and places it in the Journal folder on the local computer."

Help link: http://help.autodesk.com/view/RVT/2015/ENU/?guid=GUID-B4507B0F-0FA7-4FB7-85C3-5C81A756191C

Consider cleaning this folder out occasionally as it can become quite large. Especially if you do a lot of troubleshooting and are opening large project files with the "discard worksets" option.

I recently ran the CTC Express Tools Revit Family Processor (RFP) to upgrade all of our content. Even though the RFP deleted the backup files in the family folders, Revit still created a backup of every family in the Journal folder. That was a lot of stuff!

These journal-folder backups are in addition to the backup files Revit creates in the same folder as the RFA or RVT (if worksharing is not enabled). Speaking of the "normal" backups, we are able to specify the number of backups when doing a Save As, and selecting the Options button while in the Save As dialog, as seen in the image below.


I won't get into it now, but backups and restores for worksharing-enabled Revit projects is a totally different animal.

Understanding how Revit makes backups can 'save the day' when a computer crash, power outage or accidental saving over a file happens; notice I said "when" and not "if".

If you don't have an IT department backing up your files you should also be syncing your files in the Cloud using Dropbox, Carbonite, OneDrive, Google Drive, Autodesk A360, etc.

Also, consider enabling Microsoft Window's Previous Versions feature on your computer.

Thursday, March 30, 2017

Enscape Grass; Too Cool

I tend to use and promote native Revit workflows and the biggest-bang-for-your-buck tools. Rendering in Revit and the Autodesk Cloud has its place, and I still use them often. I wrote about Revit 2016's new render engine via an AECbytes article; Revit 2016's New Physical-Realistic Rendering Engine.

However, all of the tools I typically use have left a lot to be desired when it comes to grass.

Enscape just released a new update that has some amazing grass as shown in the image below; thick and modeled rather than flat and repetitive. I first discovered this new feature while presenting earlier this week, read about that here, on Revit rendering, Revit materials and Enscape. What a pleasant surprise!

  • Update: This feature is currently only available in the Enscape Preview release, which can be downloaded here: https://enscape3d.com/preview/. Like most beta software, it is not recommend to be used in production (just for testing).


Any material with the word "grass" gets this special treatment... off the cuff, I told the interior design students they may be able to leverage this for shag carpet:)

The only tricky thing I have seen with the grass is if there is a small gap between the building and a toposurface sub-region there will be some grass poking up there. This makes it look like someone needs to get our there with a weed wacker!

I believe the only way to turn this new grass feature off would be to rename your material to not have the word "grass" in it. I also do not see a way to control the height of the grass - this is one healthy looking lawn. One thing you can change is the Appearance Asset's Tint setting (via Revit Materials dialog) to adjust the color if you wish. Let's say you want a darker green, shag carpet or you are creating a model for Smurfsville and shown in the image below.


While on the subject of Enscape, the image above has a Skybox (HRD) file loaded. This encloses your project in an environment with a flat bottom (ground) and a dome shaped lid. The image below shows a different Skybox file selected.


The Skybox file is selected from Revit, in the Enscape Settings dialog as shown below.


Here is a link to Enscape's help page on the Skybox feature which also lists some good places to get HRD files. https://enscape3d.com/knowledgebase/skybox-as-a-background/

Enjoy!

CTC Express Tools: Revit Properties (Free)

When you install CTCs BIM Project Suite you get several tools, some free, that work within Revit. There is also a super nice tool which works outside of Revit; CTC Revit File Properties.

Right-click on any Revit file in Windows Explorer and you see the Revit Properties option in the menu.


Selecting this command opens this dialog:


Pretty self explanatory... but notice this example is not a central file, worksharing is not enabled, I can open it and also copy this information or the preview image to the Clipboard.

Ok, your wondering "what if I have different versions of Revit installed or the Reivt file is an old version I don't have installed?". As in the previous image, the correct Revit version is automatically selected. In the image below, I don't have Revit 2011 installed so I can pick which version to use - and thus will expect an upgrade.


In the example below, the file in question is a Central file. So what happens if I open it from here... does it open the central file? Maybe.


You decide; but the default is "Create New Local".


Worth every penny;) Enjoy. https://ctcexpresstools.com/

One warning: If you have increased Windows DPI scaling, maybe you have a 4k monitor, then this dialog does not yet resize, so it will be hard to read. I assume this will be fixed in a future update.

Wednesday, March 29, 2017

Revit Materials; Painting a Material Parameter

Most Revit users know how to assign a material to geometry in the Family Editor. The result is all faces of the selected element displayed the selected material. A feature I find a lot of people are not aware of is painting a material parameter onto individual faces. Doing so allows us to adjust the material of individual faces within the project environment.

This challenge reveals a fundamental problem with Revit materials... in the real world materials and finishes are not always the same thing. A good example is paint (finish) applied to CMU, Gyp. Bd. Conc (Materials). Revit has no good way to fully account for finishes apart from a material. More on this in a future post.

The following detailed steps show how to create and apply a material parameter, using the Paint tool, in the family editor and then see its result in the project environment.

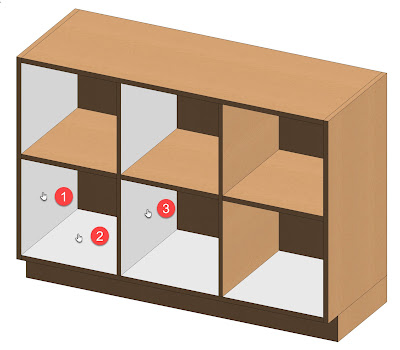
  • I will start with this base cabinet example were the interior finish if often different than the exposed parts. Currently a wood material is assigned to the geometry and thus it is visible on all surfaces


  • In the family editor, create a new parameter and set the Type of parameter to Material as shown below; name it whatever you want (Interior Finish in this example).

Creating a material parameter in a family

  • Start the Modify (tab) > Paint tool, and select the material Parameter - not the material. Notice material parameters have "(param)" listed after their name.
    • This applies a parameter that can be changed in the project, rather than a material that cannot be changed; obviously a material could be modified, but it cannot be changed.


Paint tool in family editor

  • Click on any face to apply the new material parameter to it.
    • If the material parameter already has a material assigned, the selected faces will immediately change.


Material parameter painted onto three faces in this example

  • Now, when the family is selected in the project, the material parameter is listed in properties and the assigned material can be changed.


Material parameter for selected family

Painted materials have no thickness so its Cut Pattern is irrelevant, but the Surface Pattern and Appearance asset settings are used.

Simple but powerful feature!


Revit 'Sun and Shadow Updater' Error Message


When adjusting the Sun settings in Revit 2016 or 2017 you may get this error: "Third party updater 'Sun and Shadow Settings Updater' has experienced a problem and its action had to be canceled."

Revit error displayed when changing Sun settings

The problem relates to Dynamo and since it gets installed automatically now you have to manually update it to resolve this issue.

Here is a link to Autodesk's knowledge base article on this:
https://knowledge.autodesk.com/support/revit-products/troubleshooting/caas/sfdcarticles/sfdcarticles/Third-Party-Updater-Error-Message-Sun-and-Shadow-in-Revit-2016.html

FYI: Before I knew what was causing this I would just click Disable Updater and not experience any issues with normal Revit functionality.

Tuesday, March 28, 2017

ARCHITECT Magazine's VR Article; My Work Mentioned


ARCHITECT Magazine's article 5 Steps to Make VR a Reality in Your Practice by Michael Kilkelly was published this week. Some work I have been doing in the realm of Virtual Reality (VR) at LHB is mentioned in this article along with two images.

LHB VR Lounge
Elaborating on the first LHB provided picture in the article, we have taking an underutilized space and created what we call the LHB VR Lounge. This dedicated space facilitates team and client meetings where everyone can comfortably, and perhaps vicariously, view what the person using the VR equipment is seeing.

It may be hard to see in the first picture, on the left, but the room has an amazing view of the world's largest freshwater lake, Lake Superior (this lake has the same area as Ireland).

HTC Vive Alcove
The second image, on the left, shows the VR alcove sporting permanently mounted sensors with dedicated power outlets. The space could be a little larger, but sometimes you have to take what you can get!

The article also has a link to an example project on LHB's VR page on the firm's website. This page facilitates our public Google Cardboard-type content. On this page one will find both computer generated and photographed experiences. The image below shows our custom branded viewers. http://www.lhbcorp.com/vr/


LHB VR Viewer
I first met Michael at an RTC-Europe event in Dublin Ireland. He, like me, is a highly motivated individual. In addition to writing for ARCHITECT Magazine, he is a practicing architect and manages the site ARCHSMARTER where he posts about design and technology, offers courses on coding and Dynamo, provides Revit macros and consulting services. Oh, he is also an active parent! I recommend you go to his site and sign up for his weekly newsletter.

By the way, the other LHB provided image in the article ties in nicely with the recent NVIDIA customer success story as it talks about the same horizontal street project we are working on. Click here to see my previous post on that.


Sunday, March 26, 2017

Even Homer Nods; SDC Publications Book Errata

When dealing with the printed word there are bound to be mistakes... on a similar note, I have never seen a perfect set of construction (tender) documents even when BIM is at its core:) The post title alludes to the ancient Greek poet Homer, author of Iliad and Odyssey, who is said to have made mistakes despite his recognized abilities; thus, the saying "even Homer nods" (click for Oxford def).

I would like to highlight how SDC Publications (https://www.SDCpublications.com) deals with mistakes, aka Errata, that occur in their books. Note that some of these issues are made by the authors while others are due to software updates or changes to websites. The most recent problem I had to deal with is the sudden disappearance of Autodesk Seek. See my LinkedIn post for more on this; RIP Autodesk Seek.

Per the series of screen shots below, SDC Publications maintains an Errata page for each book. If you are using one of their books you should check out the Errata page for any updates to make sure you get the most out of the book!


In the last image, notice there is a place to Submit Errata you find. I must say, I am very grateful to everyone who takes the time to do this. Personally, I take a lot of care in making sure those corrections are added to the next update.

Speaking of mistakes, I have to thank the editors at SDC Publications for reducing the number of mistakes in my books!!!

I plan to use this blog to highlight errata as they come up and provide a link to the official errata page. So stay tuned... those posts are inevitable because I am far from being a great literary author.


Friday, March 24, 2017

BILT 2017 Speaking Engagements

This year I will be speaking at two of the four BILT (formerly RTC) conferences--one in Toronto, Canada and another in Aarhus, Denmark.

Here is what I will be presenting:

BILT-NA, Toronto, Canada (August 3-5, 2017)
  • What's New in Revit 2018
    This is a panel-type presentation with Clay Hickling (BILT-ANZ Committee) and Stephen Taskin (Woods Bagot). We will be highlighting all the new features in Revit 2018; published and unpublished! Big shoes to fill here as Steve Stafford has typically done this one at RTC-NA.
    • Speaking of new 2018 features, I will be writing about my recent week-long trip to Autodesk's Shanghai, China R&D offices to learn about and test 2018 (and beyond) new features!
  • Luminaire Families for Experts
    In this lecture I will be covering detailed tips and tricks to get the most of your light fixture content in Revit and beyond. Following these steps will result in better renderings, VR experiences, and lighting analysis when using ElumTools. I have some experience presenting on this topic; LinkedIn post on past training for ElumTools.
  • (wait listed) Energy Analysis with Revit and Insight 360
    This is based on my top-rated session at last year's RTC-NA in Arizona. This class will become real if any speakers drop out. Not hoping people drop out, but more people need to hear about what Insight 360 has to offer our industry... I describe it as the most democratize early-stage energy modeling tool on the market.


BILT-EUR, Aarhus, Denmark (October 5-7)
  • New Revit 2018 Feature
    This presentation is based on some new features I cannot mention yet at Revit 2018 has not been officially released. This is on two specific features and not the same big-picture overview mentioned above.
  • (wait listed) Luminaire Families for Experts
    This class will become real if any speakers drop out. This is the same presentation mentioned above for BILT-NA.

Like several other attendees, e.g. Mackey's, I have been able to bring my family to several past RTC conferences - and plan to do the same this year! For anyone thinking about this, here is a guest post I wrote for the RTC blog a while back; RTC Family Vacation – An Attendee’s Letter.

Hope to see you there!

Thursday, March 23, 2017

Guest Enscape Blog Post and UofM ID Lecture

Next week I will once again be doing a guest lecture for Professor Abimbola O. Asojo's interior design students at the University of Minnesota. This reminded me of a related guest blog post I wrote for Enscape and thought to share here...

UNIVERSITY OF MINNESOTA’S INTERIOR DESIGN STUDENTS LEARN ABOUT ENSCAPE

Speaking of Enscape, we also have an project on their gallery page. This project was also featured in the Minneapolis Star Tribune; covering our use of VR with the developer.


I also used Enscape to create all the cover art for my Revit 2017 textbooks.


Wednesday, March 22, 2017

LHB's NVIDIA Customer Success Story

Based on some interesting things we have been doing with NVIDIA graphics cards and Virtual Reality (VR) the nice folks at NVIDIA decided to write a customer Success Story. The article and a related post went live today!

NVIDIA blog post: How VR Is Helping Revitalize Downtown Duluth

NVIDIA Customer Story: Previewing the Future of Urban Renewal

I have lots to say about our various uses of VR in future posts; such as on many buildings, a historic bridge, industrial and civil projects as well as multiple public meetings. For now, I will let these NVIDIA's posts start things off.

A big thank you to NVIDIA's Andrew Rink, who I first met at RTC in Ireland, for making this happen!


Fun stuff.

Tuesday, March 21, 2017

Project Phases Disappear in Revit 2017


If you do electrical work in Revit 2017 there is a bug you should be aware of. The result of this bug is that all project Phases (i.e. Existing, New Construction) disappear as seen in the image below.

All phases missing from Revit project

Normally, phases cannot be deleted - just combined with an adjacent phase. But, in any case, the last phase cannot be eliminated from a project.

This is really bad and difficult to fix. Just creating new phases is not the answer as the Room/Space elements are technically still in the model but not accessible - remember, those elements are hardwired to the phase they were created in. Even if you create a new phase with the same name, that does not resurrect the Room/Space elements.

Only Autodesk Support can fix this issue. However, on most projects, in the midst of production, the time it would take to send the model and get it back from Autodesk would result in too much downtime for the project and staff. Thus, going back to the last backup, good local file or Windows previous version is the best option.

But you are asking, why or how might this happen? Good question. It appears to be narrowed down to using the Spline Wire command; starting the command, selecting one electrical connector in a family and then canceling the command (Esc key). However, this is not easily reproducible.


Here is what Autodesk currently has to say about this: https://knowledge.autodesk.com/support/revit-products/troubleshooting/caas/sfdcarticles/sfdcarticles/Phases-disappear-from-project.html

Here is a forum post about this same topic: https://forums.autodesk.com/t5/revit-mep-forum/project-phases-disappeared/td-p/6400515

So, if you are using the Wire command in Revit 2017, you should consider checking the Phases dialog before each Sync w/ Central.

Fun stuff.

Monday, March 20, 2017

New Book: Autodesk® Revit® 2017 Architectural Command Reference

I am happy to announce a new Revit book titled "Autodesk® Revit® 2017 Architectural Command Reference" and is now available in hard copy and digital format.

Autodesk® Revit® 2017 Architectural Command Reference
This book provides you with an easy to use reference for all of Autodesk Revit’s Architectural Commands. This command reference can be used as you are working in the software to help you understand what each command does and how it may be used in your overall workflow. Also included with this book are nearly 100 videos tutorials which will further help you master Autodesk Revit; click here for a sample.

The book is organized in the same way the Revit user interface is presented. Each tab of the Ribbon is represented as a chapter in the book. Within the chapter each button is represented in the book as it appears on the Ribbon from left to right. Organizing the book in this way makes it easy to locate each command in the book and understand its use.

Quick Steps outline of each command covered
For each command entry you will see a brief description of what the tool will do, how it is used, and the options you will be given as you use the tool. In some cases the author’s suggestions or tips about the use of the tool will also be presented. As you learn the tools in Revit you may not need to read the full entry on the tool. To help facilitate this, many of the tools include a “Quick Steps” section to explain the tools and options in outline form.

Several tips provided
This book will help facilitate your learning of the Revit interface and all of the commands. For more experienced users, the command reference may introduce you to commands you have not used before or help you with commands you use less frequently. Whatever level of user you are, this command reference becomes a valuable resource to you as you work with Revit.

Even though the next version of Revit will likely be out soon (assumption based on the pattern of previous years), many firms do not upgrade for a while. Plus, this gives instructors time to review and make adoption decisions for next fall (i.e. August of this year). At that time, the updated version of this book will also be ready!

We think this will be a great reference for both students and professionals. Enjoy!

Details:By Jeff Hanson, Daniel John Stine CSI, CDT
Published February 15, 2017
736 Pages
ISBN: 978-1-63057-048-4

Links:

Free Examination Copy:
High School, College and University instructors can request a free examination copy via SDC Publications via email or by phone 913-262-2664.

Revit 2017 and Windows DPI Text Scaling Issue

Revit 2017 has a new text engine, and as many already know, this can cause some formatting issues when upgrading a pre-2017 file. I talk about that in my AECbytes article What's New in Revit 2017 and show an example. This is by design and requires one-time manual adjustments to correct.

There is another text-related issue with Revit 2017 that is not by design. The problem is not with formatting, but with parts of text disappearing as seen in the next two images.

Text appears properly
Portion of text elements missing

The problem steams from team members having different DPI Scaling settings, aka text scaling, set on their computer for the same project. Check out this Windows blog post for more on DPI Scaling.

The person who created the text, at their DPI Scale setting, can see the text just fine. However, if someone opens the project with a different DPI Scale setting they may see cropped text as shown above. Apparently the DPI Scaling ever-so-slightly affects the text size but this does not cause a regeneration of the text in Revit. Not only is this a problem on the screen, it also prints that way!

When the person who original created the text opens the file again everything looks and prints fine.

The solution is for everyone to have the same DPI Scale setting until this is resolved by the developers at Autodesk. This can be a challenge for staff who need this adjustment to help their eyesight. Those using 4k monitors also change this setting - or it is automatically changed for them by Windows.

The Fix for someone having this problem, and they need to see and print the text, is to make a small edited to each text's Type Properties and then undo that change... this will force a regeneration. Or, of course, some API or Dynamo magic would help!

Fun stuff.


Sunday, March 19, 2017

LHB's Performance Driven Design Blog

I recently wrote a post on Autodesk Insight 360 for my firm's blog; Performance Driven Design.

If you are interested in sustainable and performance based design then you may want to go to this site and enter your email address to follow.


Some of the other topics covered recently:
On the topic of "plug loads" I have been working on a way to visualize plug loads in our Revit models and in VR. We have some really cool stuff happening in our electrical group... in fact, we created the Electrical Productivity Pack sold by CTC Express Tools

If you are interested in more information on Insight 360, check out the more detailed article I wrote for AECbytes.

Fun stuff!

Saturday, March 18, 2017

Materials in Linked Revit Models

This is my "hello world" blog post... I hope you like it! In this first post I want to share some material from my top rated Mastering Materials class I presented at RTC (now BILT) Singapore in 2015.

Revit materials are used in renderings and analysis tools such as Autodesk Insight 360 (i.e. thermal properties and reflectances for daylight), ElumTools (i.e. reflectances for daylighting and electric lighting illuminance calcs) and "VR-enablers" such as Enscape, Revizto and Fuzor.

When dealing with linked Revit models, all materials need to be set in the source Revit file. This can be tricky if the linked file is coming from an external consultant.

Following the image below are notes on how each material was applied in the MEP Revit model -- which will then appear properly when linked into the architectural model. FYI, this image is from the Revit model of our LEED CI Platinum office in Minneapolis, MN, USA. USGBC-MN is also co-located here through donated space by LHB.

Adding materials in a mechanical model


A: You can set a material in Object Styles to quickly apply a material everything, in a sepcific category, in the model as shown in the image below. This is overridden by the subsequent techniques mentioned below.

Add material via Object Styles in a mechanical model

B: It is also possible to Paint materials on some elements. This is required if the color needs to change. For round duct, you need to paint four separate quadrants for each section of duct. Also, you cannot paint a material on a duct fitting.

C: Most Loadable Content (i.e. regular families) can have materials assigned as usual.

D: You can also assign materials to the Duct or Pipe Systems as shown in the image below.

Adjusting the duct material via the duct system type

When working with a consulting firm, they will need to send any custom image files (jpg, png) with the model. For multi-discipline firms, like mine, we save custom files in a common location on the network and that path is added in Options > Rendering so everyone in the firm "sees" them.

Fun stuff.