Showing posts with label Rendering. Show all posts

Monday, April 15, 2024

AI-Generated 2025 Revit Book Covers using Veras by EvolveLab

This year I used Veras by EvolveLab to generate the covers of my Autodesk Revit 2025 textbooks by SDC Publications. These generative AI-created images are based on the Revit model created in the books and contain no post-processing.

Plus... win a free one-year license of Veras on an upcoming episode of BIM Pure I will be a guest on.


keep reading to learn more...

Thursday, December 14, 2023

SketchUp Diffusion - AI Extension is Live

Trimble has developed an AI image generator extension for SketchUp, called SketchUp Diffusion, which is now live. I will share my very first use of this tool in today's post, which resulted in a decent set of images based on my model and prompt.


keep reading to learn more...

Friday, April 24, 2020

Free Webinar Recording Link + $49 Enscape Training Course Promo

In today's post you will find the link to the free webinar I did yesterday, with Michael Kilkelly from ArchSmarter, called Revit Rendering Makeover. You will also learn about a special $49 course I created around the topic of Revit and Enscape to produce stunning architectural presentations.

  • Free 1 hour webinar recording link
  • Three hour video-based course for $49 until April 30th (normally $99)


keep reading to learn more...

Friday, November 29, 2019

New ArchSmarter Enscape Course + Black Friday Sale = Awesome Fun

Have you been wanting to learn Enscape but don't know where to begin? Or, have staff asking for related learning resources?

Well, I have a great option for you! Today's post covers a new ArchSmarter course I created to help learn and maximize the potential of Enscape; the real-time rendering software for Architects, Engineers, Contractors and Owners.

Details:

  • Videos: 26
  • Time:    3 hours
  • Cost:     $99/person (save 30% per sale mentioned below)

ArchSmarter Black Friday Sale:

  • Save 30% now through Monday
  • At checkout, enter the code THANKS
  • See Michael's email below for more details and additional offerings


Keep reading to learn more...

Thursday, November 7, 2019

ArchSmarter Webinar - Revit Rendering Makeover by Michael Kilkelly

In this week's Thursday Top 5 email, Michael Kilkelly from ArchSmarter announces a free webinar he is doing next week. Don't get the weekly email? Sign up here: https://archsmarter.com/join/

Here are the details...
I'm hosting a makeover show next week! No, I haven't become a beauty blogger. Instead, we'll be looking at ways you can makeover your Revit renderings. From view selection to lighting to texture images, there's a lot you can do to drastically improve the quality of your renderings. In the workshop, I'll share five ways you can add a little pop and a lot more sizzle to your Revit renderings. The workshop takes place next Thursday, November 14th at 2 pm EST. 
Click here to register for the free workshop.

Additionally...

Tuesday, December 19, 2017

Enscape Blog Post: BEST PRACTICES FOR CUSTOM RPC CONTENT

I had a lot of fun writing this new blog post on custom RPC content for the Enscape blog.


Ever wanted to get custom RPC content into your renderings? Check out this...

Monday, December 18, 2017

Revit® Materials - Appearance Images

Here is an older tip I posted on LinkedIn a year and a half ago, and thought I would copy it over to my blog...

When a design team is developing a Revit model and materials are being applied, everyone needs to make sure they understand a few things about the process to ensure success! I want to share a problem that comes up occasionally and discuss the solution.

The Problem
When someone starts a rendering, either locally or in the cloud, Revit will...

Saturday, November 4, 2017

Enscape Blog Post: Best Practices for Lighting and Exposure

I had the privilege of writing another post on the Enscape blog this week. The article digs into reasons why a scene is too dark and a few simple Enscape settings to greatly enhance the view.

Below, I also mention my previous post and a recent presentation at the University of Minnesota.

I want to give a quick shutout to ArchVision too, as most of the images in the post contain their RPC "office clutter" content for Autodesk Revit. When you combine  Enscape and clutter you get magic.


[in case you can't see it, this post continues below]

Thursday, September 21, 2017

Revit Light Fixture Tips for Rendering

Yesterday I did a webinar for ArchVision which focused on lighting and materials in Revit Renderings and also touched on the third-party add-in for Revit, Enscape.

Here is a link to both rendering webinars hosted by ArchVision:


Below are a few points I touched on in that presentation...

Thursday, September 14, 2017

Free Webinar: "Revit Rendering with Dan Stine - Materials and Lighting" presented by ArchVision

The long title to this post says it all. As a sequel to the successful first presentation on rendering in Revit, I will be diving a little deeper on materials and lighting.

You can watch the first presentation here: "Revit Rendering Workflows" with Dan Stine (approx. 90 minutes)

The details are as follows...

Tuesday, August 29, 2017

Lighting in Renderings plus Another Free ArchVision Webinar

The other day I was comparing notes with Scott Brown, from The Beck Group and a Top 10 Speaker at BILT-NA 2017, about a lighting problem we both experienced in recent rendering efforts. This is one of those things where I knew the answer, but had forgotten. Once I found the answer, I was like "I knew that!".

Problem:
A continuous light source, as shown in the image below, does not emit light properly when rendered, as evident in the second image. Often, this is not noticed unless you have a light near a wall or ceiling were the hot spot is clearly not correct.


Solution:

Monday, June 12, 2017

Creating a Fence Material and Finding Local Assets

When you need a new material, searching the project and Autodesk libraries is the best place to start (see image below). Sometimes a material does not exist, as in this “fence” example, but an Appearance Asset does; which will get you part of the way there.
Searching for a material
Searching the Asset library reveals a chain-link fence option.
Searching for an asset
When this asset is loaded into a Material, it contains several settings, such as image size, cutout and Bump.
Adding a cutout image for a chain-link fence material
The image below shows the images used to create a fence render appearance (visible in realistic and rendered views). For these images, I did a Google “Images” search and quickly found a tillable image of a fence. Then I made a copy of the image, edited it in Photoshop to look like the second image below (which took about one minute), and then assigned this image as the “cutout” on the Appearance tab. The black areas in the cutout image are the transparent portions as seen in the rendered image on the right.
Combining main image and coutout image to produce result shown on right
For the fence example, you would still need to manually add the Identify and Graphics information manually. For example, the surface pattern and Texture Alignment (to make the drafting views and rendered views align).

Another cutout example...
Back rest mesh material: cutout: Furnishings.Fabrics.Netting.Mask.jpg

Surface pattern texture alignment
Another thing you can do is search the materials and textures folders on the hard drive. The image below shows the results from searching for “fencing” at this location (in Windows Explorer): C:\Program Files (x86)\Common Files\Autodesk Shared\Materials

As you can see there are several “fence” options not revealed in our previous searches (discussed above).
Searching the materials folder via windows explorer
  • TIP: Switch to thumbnail preview mode to see the images.
You can even search in the Revit dialog’s as shown below.
Searching within the Revit open/load dialog


Tuesday, June 6, 2017

Over 450 of My Closest Friends; ArchVision Webinar a Success!

The ArchVision webinar "Revit Rendering Workflows" I presented today was a success! Over 700 people signed up with just over 450 logging in for the live presentation.

Five lucky attendees won a copy of my new Interior Design Using Autodesk Revit 2018 textbook.


The presentation was recorded... I will update this post with a link when it is ready.


Below are a few images showing the new ArchVision RPC office clutter content. Notice the Revit textbook on display as well! click to enlarge images


Simply drag and drop the clutter content from ArchVision Dashboard into a Revit view.


Some of the clutter has super-convenient type properties... like this picture frame where we can change the image and the material of frame! Duplicate the type for variety. BTW, this is my son!

Here are the Revit properties for the picture frame.

One more quick clutter example... go from a single book laying flat to five vertical books with randomized color and size!

Properties for the book RPC.


Finally, I also showed some custom RPC content.

Some are 2D, created in Dashboard. The cool thing about these elements is they always face the camera!

The 3D content is from scans done at the Mall of America in the Me3D store (owned by CAD Technology Center). Randall, from ArchVision, used his new RPC Creator tool to create one of them. The others were created by CTC. Thanks guys! I am an RPC:)

The image below shows all the custom content in Enscape as well as Phil Read's neon light sign (time-of-day set to 1 am in this view). Also, the track lighting is a Revit railing with each light a "railing support" This allows each light to be un-pinned and moved along the track! Oh, this image also has my friend Jon Rose in it and two Turkish exchange students who went to the MOA with us.


Here is a short video from the Revit environment showing my RPC in hidden/shaded/realistic mode.

So much more to say, but not enough time... you will have to watch the recording.

Tuesday, May 30, 2017

Free ArchVision Rendering Webinar Presented by Dan Stine

If you have any interest in general rendering techniques in Revit and beyond... consider sighting up for this free 90 minute webinar! ArchVision is hosting and I will be presenting. This will be a live presentation with 15-20 minutes for questions at the end.

  • "Revit Rendering Workflows with Dan Stine" presented by ArchVision
    Tue, Jun 6, 2017 12:00 PM - 1:30 PM CDT
    Register Now!

I will be covering materials, lighting and using RPC content to make your rendering come to life. Workflow into Enscape and Revizto will also be covered.

  • Bonus: I will also be unveiling two new "chunks" of content from ArchVision... you have to tune in to find out what they are.

The example Revit rendering below is from my Interior Design Using Autodesk Revit 2018 textbook. This example contains several ArchVision RPC families, including a custom version of me (gray vest, middle left)!


This next Revit rendering is one I did for our Minneapolis office... read this related ArchVision blog post: LHB Minneapolis Office Renderings Submitted for LEED® CI Platinum. FYI: This is an old post, LHB was awarded the LEED certification!


Although this is geared towards beginners, I will be covering a few cool tips and tricks that even experienced users might not know (or remember:)).

The best part is ArchVision is offering this presentation for free!

Friday, May 19, 2017

Brick Material and Assets Library in Revit

I few years ago I had an intern create a Revit material and asset library based on a brick manufacture's specs and images. A few of them are not very good due to the small sample area of the image, which creates an unpleasantly distinct repeating pattern, and a few of them do not repeat very well. However, it is a good example of how one might create a custom library for materials AND assets; the later will be the more interesting discussion here.

  • FYI: I also spent some time talking about this in my top rated Mastering Materials in Revit session at RTC-Asia 2015 (now BILT) in Singapore.


Here is a quick look at the materials in a Revit project (click to enlarge).

The next three images show the material definition for one of the brick materials.

Identity tab includes information about the product and a URL link for more information on the supplier/manufacturer's website.


The Graphics tab has the shading color defined by the Render Appearance and the Surface Pattern matches the brick size/pattern.


The Appearance tab defines the realistic/rendering/VR texture. Notice this is a "Masonry" material asset type and it has two images assigned. In this case, the surface pattern is a Posterized version of the original image file and the joints have been made completely solid. This step creates a little more distinction in the relief. It is perfectly fine to just use the original material as the relief (I do it often).

  • FYI:  I have noticed, that somethings the advanced materials get washed out in Enscape. In this case, this should be changed to a "Generic" material.


I do not recall why the Finish is set to Glossy. Below is a close up view of the material. The white highlights are related to the glossy setting and the current sun position in the view.


Clicking on the image swatch opens the Texture Editor. Here is where the size of the texture is defined (i.e. Scale parameters). This is also where the material is set to Repeat vertically and horizontally.

The same values are entered for the Relief Pattern image.


The Material Browser has an icon in the lower left which allows you to create a new material library or open an existing one. For the brick material library I simply created a new library, which involved providing a name and location for the ADSKLIB file.
I placed all the image files (textures) in a folder along with the ADSKLIB file on the server so everyone has access to it.


Anyone using these materials will need to add this path to the Additional Render Appearance Paths in Revit's Options dialog. If this is not done, the material will be gray. These special paths can be incorporated into a deployment. I have several in my deployment; for brick, Herman Miller, Haworth, etc.


Anyone who needs access to this library can use the Open Existing Library option in the Material Browser dialog (shown previously). Make sure the File of type is set to ADSKLIB (not structural property set).


Once loaded, the new library is listed in the Library Panel as shown below. Materials can be loaded into the current project, just like you do with the Autodesk provided materials. Unless the custom library is in a read-only folder, project materials can be dragged into the custom library as well.


When a material is saved to a custom material library, it includes the main material and its assets (i.e. appearance, thermal, structural). Sometimes, we just want to change a brick material already defined in the project; because it is used by several walls, families, etc. In this case, it is easier to modify the existing material.

It is possible to replace a material's asset with another one...
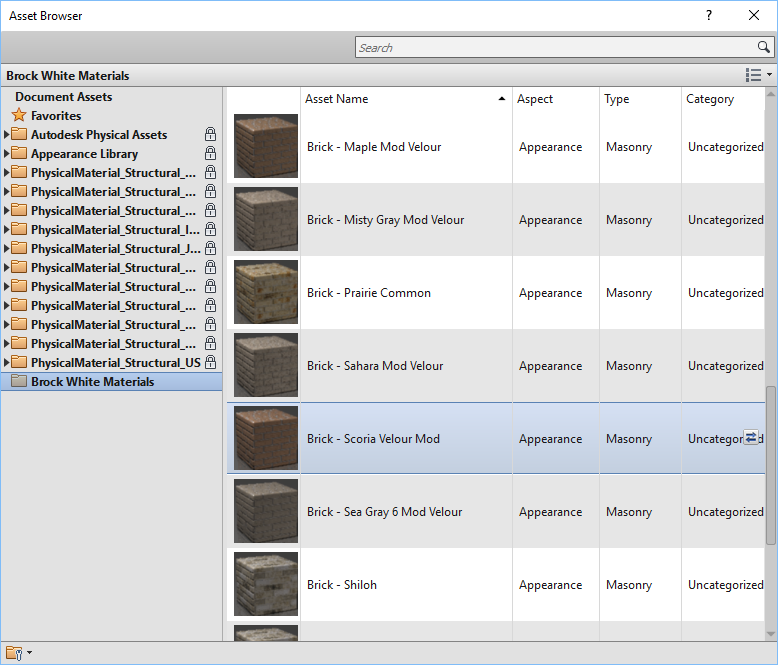

In the Asset Browser, we can also load the custom material library. This gives us direct access to the appearance assets associated with the main materials as shown below.

If needed, the material assets can be modified apart from the main material. This may not need to be done very often, at least in this example. However, when you need to do it, the process is not very intuitive. From the Manage tab, select Additional Settings and then Materials Assets.


When both the Asset Editor and the Material Browser are open, double-click on a material to load its settings into the adjacent Asset Editor dialog as shown below.


This is a little bit of a tangled web, but getting a handle on this will make the design process and visualization efforts a little more efficient!