
My recent post, Cost Estimating Directly in Revit, has been very popular so I thought I would share another similar post on developing a space program, or brief, directly in Revit. This post is also based on material I presented in a session titled Interior Design Workflows at RTC-Asia 2015 in Singapore (now known as BILT and DBEI.) FYI: I touched on this topic in this post: Program Development within Revit - Last Week at NDSU
A Space Program schedule can be created in Revit prior to any modelling—eliminating the need for Microsoft Excel.
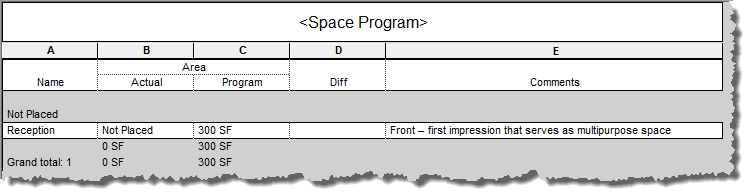
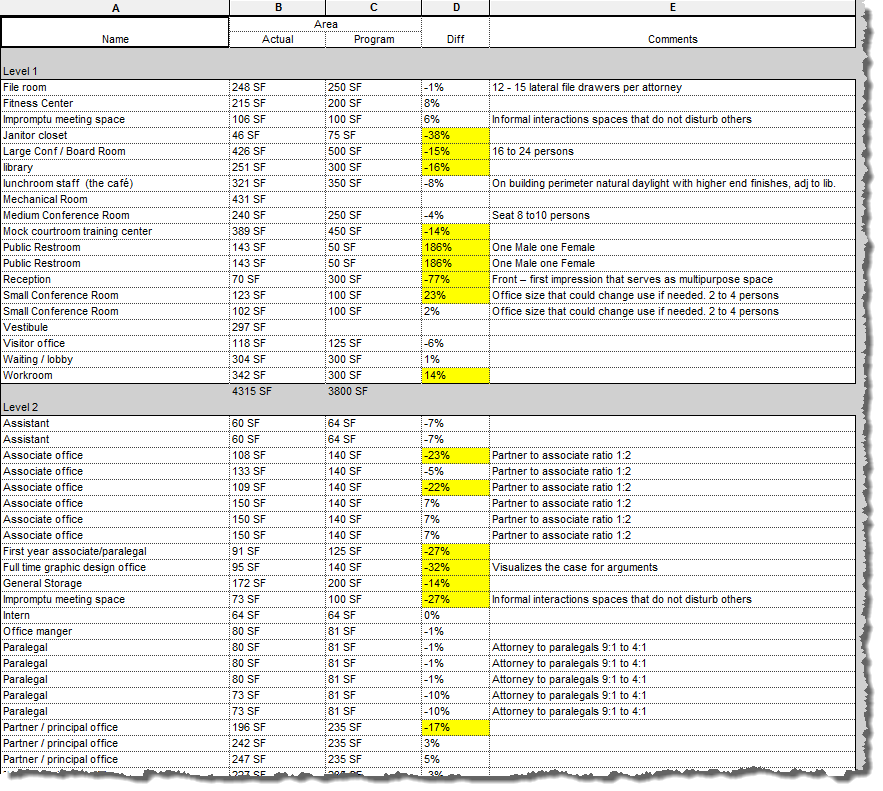
The example schedule below has three basic Revit parameters and two custom parameters:
While in any Room-based schedule, clicking Insert Data Row will add a new row. As
shown in the image above, we know the Room is not in the model yet as the Actual Area column says Not Placed.
In addition to showing the program to actual difference, Conditional Formatting can be used to
highlight excessive deviations.

While using the Room tool, to place rooms in the model, the drop-down on the Options Bar allows you to place any rooms which have not been placed in the model yet. Once this list is empty, the program has been met. Note that the default option is “New” which would add new rows to the Program Schedule (or any room-based schedule).
Here is an example... no need to use Excel now, right? Not saying there are not more sophisticated tools for this task, but if you only have Revit, this works well.
They only way to fully remove a Room/Space from a project is by deleting a row within a Room Schedule.
For BIM Chapters updates, follow @DanStine_MN on Twitter or connect on LinkedIn
I also write blog posts for Enscape - a new paradigm in rendering, animation and VR for AEC.
A Space Program schedule can be created in Revit prior to any modelling—eliminating the need for Microsoft Excel.
The example schedule below has three basic Revit parameters and two custom parameters:
· Revit Parameters:
o
Name
o
Area (heading changed to Actual)
o
Comments
· Custom Parameters:
o
Program Area (heading changed to Program)
o
Area Difference (heading changed to Diff)
Additional parameters can be created to
track adjacencies, FFE requirements, etc.
 |
| Calculated value: Area Difference |
Area Difference is a Calculated Value
used to analyse the percentage difference between actual and program area (see
image to right).
·
(Area / Program Area) - 1
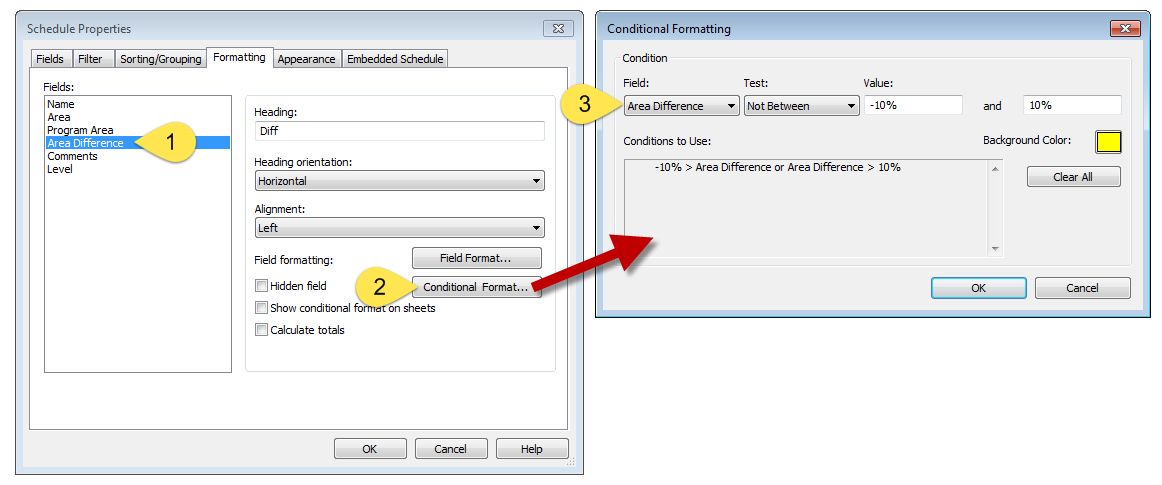 |
| Use conditional formatting to highlight deviations +/- 10% from the program area |
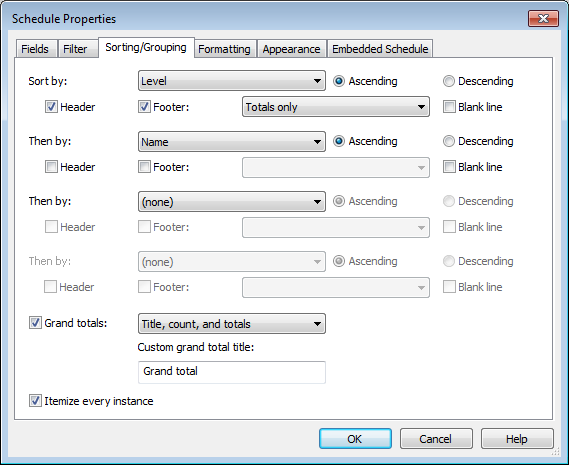
Sorting and Grouping can also be
used to group rooms together and provide area subtotals. This example, see
image below, is grouping by Level—notice the Header and Footer
options are cheeked. Rather than Level, another common option is to group by Department.
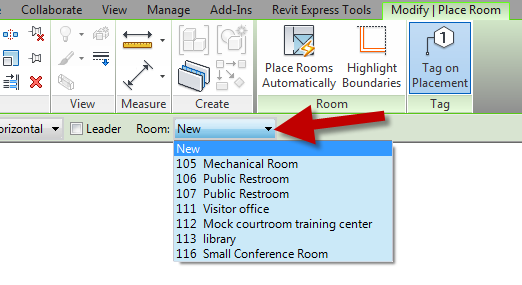
While using the Room tool, to place rooms in the model, the drop-down on the Options Bar allows you to place any rooms which have not been placed in the model yet. Once this list is empty, the program has been met. Note that the default option is “New” which would add new rows to the Program Schedule (or any room-based schedule).
 |
| Room tool active – unplaced rooms listed on options bar |
Here is an example... no need to use Excel now, right? Not saying there are not more sophisticated tools for this task, but if you only have Revit, this works well.
 |
| Example program schedule with Room elements placed in model |
One Last Thing
With all this in mind... this is why Revit never completely removes Rooms/Spaces from a project when they are deleted within a model view. Those rooms may contain important programmatic information which should not be lost just because the administration offices are moving to another floor.They only way to fully remove a Room/Space from a project is by deleting a row within a Room Schedule.
For BIM Chapters updates, follow @DanStine_MN on Twitter or connect on LinkedIn
I also write blog posts for Enscape - a new paradigm in rendering, animation and VR for AEC.