
Last week, in my graduate architecture seminar on Building Information Modeling at NDSU we talked about managing space requirements, aka the program statement or brief, before anything is modeling in Revit. We must understand what the "puzzle pieces" are before we can start the design process. This effort is often done within Excel, but can accomplished in Revit and provided additional value.
Rooms can be add to a schedule before actually being placed within the model using the Insert Data Row command. We can add custom parameters to track program area, equipment needs and even a percentage difference between program and actual area - the cell can also get filled with a color when the difference is too great, using Conditional Formatting, as shown here.

Creating another schedule of the same data, we can sort the rooms by department and get area sub-totals.
Continue reading...


When ready to place Rooms in the model, you start the Room command and then select the un-placed rooms from the Options Bar. When this list is empty you have met the program!

In addition to the main material covered each week I try to include something extra which does not typically generate any new assignments. Just a knowledge sharing opportunity.
Tying in to our discussion of managing area, schedules and previous energy analysis efforts I spent 20 minutes and showed how to quickly create this high-rise project in the conceptual massing environment. Notice how each 'mass floor' plate is different from the previous floor.

Revit allows us to create a mass floor schedule and calculate totals.

Within minutes we modeled a 12 story building and determined its total floor area.
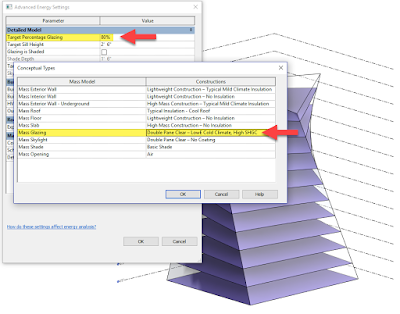
 In just a few more minutes we can start to get an idea of how much energy this design will use for a specific location on Earth. In this case I set the Window to Wall Ratio (WWR) at 80% and selected a high performance glazing option.
The Energy Analysis Modeling (EAM) in Revit is automatically created, which includes both slab on grade, interior floor and roof elements. Remembered, we just modeled a mass with six sides! One more significant thing is that this EAM is thermally zoned!

Here is the 80% glazing.

Finally, push this out to Autodesk Insight and we can dynamically adjust all inputs to optimize the EUI/Cost.

And even see localized weather data for our proposed project.

Too much fun for one week!
For BIM Chapters updates, follow @DanStine_MN on Twitter
Rooms can be add to a schedule before actually being placed within the model using the Insert Data Row command. We can add custom parameters to track program area, equipment needs and even a percentage difference between program and actual area - the cell can also get filled with a color when the difference is too great, using Conditional Formatting, as shown here.

Creating another schedule of the same data, we can sort the rooms by department and get area sub-totals.
Continue reading...


When ready to place Rooms in the model, you start the Room command and then select the un-placed rooms from the Options Bar. When this list is empty you have met the program!
TIP: This workflow is exactly why rooms are not deleted from the project when you select a room and delete it from a plan. These rooms have important data which cannot be lost when a portion of the design needs to be modified.

BTW, all of the information just discussed is covered in my Interior Design using Autodesk Revit 2019 textbook:)
In addition to the main material covered each week I try to include something extra which does not typically generate any new assignments. Just a knowledge sharing opportunity.
Tying in to our discussion of managing area, schedules and previous energy analysis efforts I spent 20 minutes and showed how to quickly create this high-rise project in the conceptual massing environment. Notice how each 'mass floor' plate is different from the previous floor.

Revit allows us to create a mass floor schedule and calculate totals.

Within minutes we modeled a 12 story building and determined its total floor area.


The Energy Analysis Modeling (EAM) in Revit is automatically created, which includes both slab on grade, interior floor and roof elements. Remembered, we just modeled a mass with six sides! One more significant thing is that this EAM is thermally zoned!

Here is the 80% glazing.

Finally, push this out to Autodesk Insight and we can dynamically adjust all inputs to optimize the EUI/Cost.

And even see localized weather data for our proposed project.

Too much fun for one week!
For BIM Chapters updates, follow @DanStine_MN on Twitter