Lake|Flato's go-to tool for all things daylighting is Climate Studio (CS), by Solemma. CS is an add-in for Rhino. Often, the design we want to study is in Autodesk Revit. This process has been extremely simplified by the Revit add-in Solemma created to streamline the process of getting a Revit model into Rhino for use by CS.
In today's post I will walk you through the entire process!
In case you didn't know, Climate Studio is the replacement, and feature expansion, of Diva. I will use my Law Office model, created/used in two of my Revit textbooks from SDC Publications.
Note that this process only applies to lighting analysis and not energy modeling. Like all energy modeling workflows, you need a very different model, which has been reduced to single plane walls, roofs, floors, etc.
FYI: click to enlarge images.
In Revit
When the Climate Studio Revit add-in is installed, you will see a ClimateStudio tab on the Ribbon, as shown below. Before clicking this button, ideally you would have a custom 3D view created (maybe called CS Export) with everything turned off/hidden that is not needed in the daylight analysis. When there is too much extra/complex geometry in Rhino, this can slow things down.
When you click the CS Export Daylight Model button you will see the dialog below. With your custom 3D Revit view current, you will select Active View Elements for the scope. Click OK.
Before the final export, CS gives you an opportunity to review what will be exported, and to exclude certain categories.
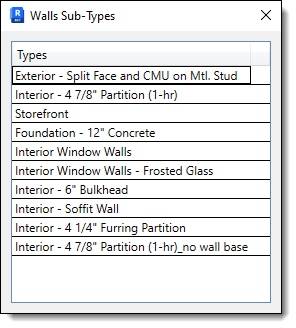
You can also click the "..." button to the far right and see the specific Revit types included in the export.
When you finally click OK the data is exported.
In Rhino
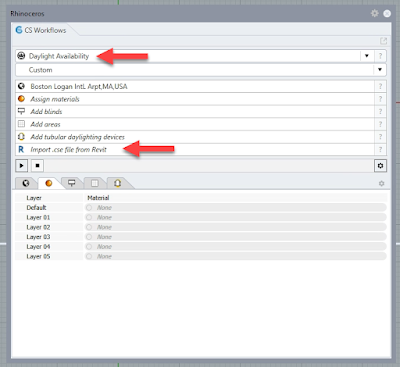
Within Rhino, open Climate Studio and select Import .cse file from Revit within the Daylight Availability workflow.
Browse to the file just exported from Revit.
Click OK...
A progress bar appears during the import...
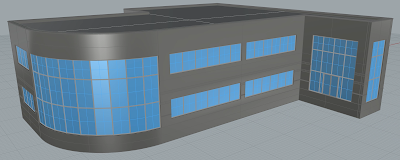
Here is the resultant Revit model in Rhino! We used to have extra clean-up steps here, including a grasshopper script to flatten all the glass.
Surfaces have been segregated to proper layers...
And, as a starting point the layers have default IES LM83 surface properties assigned to them (e.g. 20% floors, 50% walls, etc.).
By the way, I am the Chair of the national Illumination Engineering Society (IES) BIM Standards Committee. To learn more, click here.
Of course, the surface properties may be reviewed and/or changed...
An important step: select the geographic location and set north...
A surface(s) defining occupied areas is created to host the points grid. In my case, I just used the entire floor just to show the result in spaces without windows.
Clicking the "Play" button starts an analysis and then displays the results within the model (use a cut plane to view) and within the dialog.
Conclusion
There is a lot more that could be said about the process and interpreting the results. But the point of this post was to show how simple the overall process is. Daylighting is an important thing to get right on a project, as it affects occupant comfort (thermal and glare) and energy consumption (HVAC loads).
Related link:
For BIM Chapters updates, follow @DanStine_MN on Twitter or connect on LinkedIn
Lighting design professionals: check out my Revit & ElumTools training https://bit.ly/3NJjhCV


