
This year I used Veras by EvolveLab to generate the covers of my Autodesk Revit 2025 textbooks by SDC Publications. These generative AI-created images are based on the Revit model created in the books and contain no post-processing.
Plus... win a free one-year license of Veras on an upcoming episode of BIM Pure I will be a guest on.

Win Veras
First, the giveaway...
My friends at EvolveLab offered up a free one-year license that I will be giving away next week with I am on live with Nicolas Catellier on his BIM Pure YouTube channel. More on the giveaway details soon, in another post.
- April 24, 2024 at 2:00 PM Central Time

Revit 2025 Book Covers
Here are the updated Revit 2025 book covers. The books are updated and the publisher will have them ready for Fall Semester, as usual!
Click on an image to enlarge it.
Residential Design Using Autodesk Revit 2025

Available July 17, 2024
Beginner
600 pages


Commercial Design Using Autodesk Revit 2025
Available July 15, 2024
Beginner
500 pages
Have you seen the new features in Revit 2025 yet? Check out my What's New in Revit 2025 video.
Veras Workflow in Revit
Veras works in multiple ways, including as a standalone browser version. I used the Revit add-in version. In the near future I will also cover their Autodesk Forma workflow in my Forma YouTube series.
In Revit, you start with a rendered or shaded 3D view. In the Veras interface, shown below, the slider to NOT override the geometry is a key feature. Taking the geometry, i.e., your design, and making it look realistic is what sets this generative AI workflow apart from other packaged tools.
I should add that, although my book covers did not have any post-processing, that is not likely a typically outcome on real-world projects, unless early in the design or a prospective development. There will often be specific project features, materials, or other details the tool cannot possibly know. So, some image editing may be required. However, some adjustments can be made using seeds and the Refine tab which I will not be coving in this post.
After specifying your inputs and selecting how many unique images you want (1-4), click Render. Within seconds you will have options appear as thumbnails across the bottom.

Notice the setting and text prompt entered in the image below. The "Is Aerial View" is helpful in filling in more context, and "Atmospheric" is fun but is often a bit over the top:)
One thing you have to be carful of is hard lines that appear in the image that are not part of the design. For example, drastic shadow lines or the horizontal edge of the large ground plane I created in the image above. They are "seen" by the AI and used in the creation of the rendered image. Notice how you can see that horizonal edge (as a tree line) in the background of the rendered image below.

The previous example used a rendered image. The one below uses the newer Revit 2024 texture view.

In the rendered result below, notice the materials more closely match Revit because the Material Override has been throttled back.

Within minutes you can generate a ton of options. Here are several thumbnails (click image to enlarge it). If nothing else, this can offer some great inspiration to a designer.

Here are a few examples of the workflow for my interior design book. This started with a low quality rendered view saved within Revit.
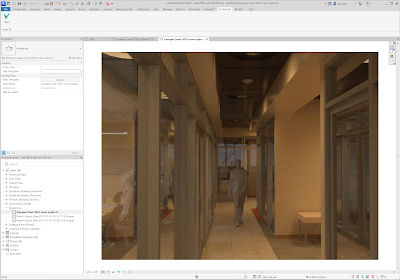
The results are interesting, including how it blurred the person. Notice the settings and text prompt I entered.


Here are a few variations...


Here are a few examples of the results...

The image below is another result from the commercial design book. I then used Adobe Photoshop's generative AI to extend the width of this image (notice the vertical line on the left). I also used ChatGPT 4 and Dall-E to create the 3D version of the mascot for my blog.

For BIM Chapters updates, follow @DanStine_MN on Twitter or connect on LinkedIn
Lighting design professionals: check out my Revit & ElumTools training https://bit.ly/3NJjhCV