
Sloped walls, and how to make them is the topic of today's post. Most people probably don't think about this until they need to make one for the first time. This post will hopefully help those who are in that situation and searching the internet for help!
If you have experience doing this and have any additional tips to share, please comment below.
There are two main ways to create a sloped wall in Revit. And neither of them are a simple built-in parameter associated with a wall. Columns used to be like that and then they got a parameter. Let's hope the same happens for walls someday! We know Autodesk is looking at adding it as this Revit Idea (600+ votes) has the feature elevated to "Under Consideration" and it is also on the Revit Roadmap.
Here are the steps:
Create an in-place family, selecting the Wall category.
 Next...
Create the 3D geometry, and apply a material.
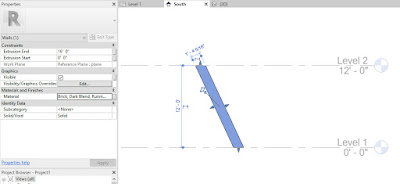
The material is applied to the entire element.


Now, use the Wall by Face command, and select a wall type from the Type Selector.

In this case, I picked the sloped side of the mass and the two (vertical) adjacent sides.

Using this method, the walls clean up at intersections and show the proper wall construction layers in plan and sections.

Here is a comparison between the in-place wall and the wall by face in section.
 And in a 3D cut-away view, with the mass category turned on...

And then turned off...

If the slope of the wall needs to change, just edit the mass...

and then select the wall and use the Update to Face command.

Be careful to never delete the mass, as the wall can never be changed again. You would have to delete the wall and create a new mass/wall.

When using this method, and using Revit + Insight to do energy analysis, you will want to use the Building Elements only option (via Energy Settings dialog) as the mass elements will be picked up as shade surfaces when the energy analysis model (EAM) is created.

For BIM Chapters updates, follow @DanStine_MN on Twitter or connect on LinkedIn
If you have experience doing this and have any additional tips to share, please comment below.
There are two main ways to create a sloped wall in Revit. And neither of them are a simple built-in parameter associated with a wall. Columns used to be like that and then they got a parameter. Let's hope the same happens for walls someday! We know Autodesk is looking at adding it as this Revit Idea (600+ votes) has the feature elevated to "Under Consideration" and it is also on the Revit Roadmap.
Model In-Place
Model In-Place is the first option with may limitations. Using the in-place method we can create sloped or complex geometric elements which represent walls and will work for visibility control and filters. However, they do not clean up well with other walls, and they do not look like other walls in section.Here are the steps:
Create an in-place family, selecting the Wall category.

Create the 3D geometry, and apply a material.

The material is applied to the entire element.

Wall by Face
Using the wall by face workflow requires a Mass element be created first. A regular Revit wall can then conform itself to the mass. Here is a mass shown next to the in-place sloped wall.
Now, use the Wall by Face command, and select a wall type from the Type Selector.

In this case, I picked the sloped side of the mass and the two (vertical) adjacent sides.

Using this method, the walls clean up at intersections and show the proper wall construction layers in plan and sections.

Here is a comparison between the in-place wall and the wall by face in section.


And then turned off...

If the slope of the wall needs to change, just edit the mass...

and then select the wall and use the Update to Face command.

Be careful to never delete the mass, as the wall can never be changed again. You would have to delete the wall and create a new mass/wall.

When using this method, and using Revit + Insight to do energy analysis, you will want to use the Building Elements only option (via Energy Settings dialog) as the mass elements will be picked up as shade surfaces when the energy analysis model (EAM) is created.
Doors and Windows
Both methods are able to host doors and windows, but normal opening families are designer to only be vertical so this does not help much. You would have to create a face based family using a void rather than the built-in opening element for openings that follow the slope.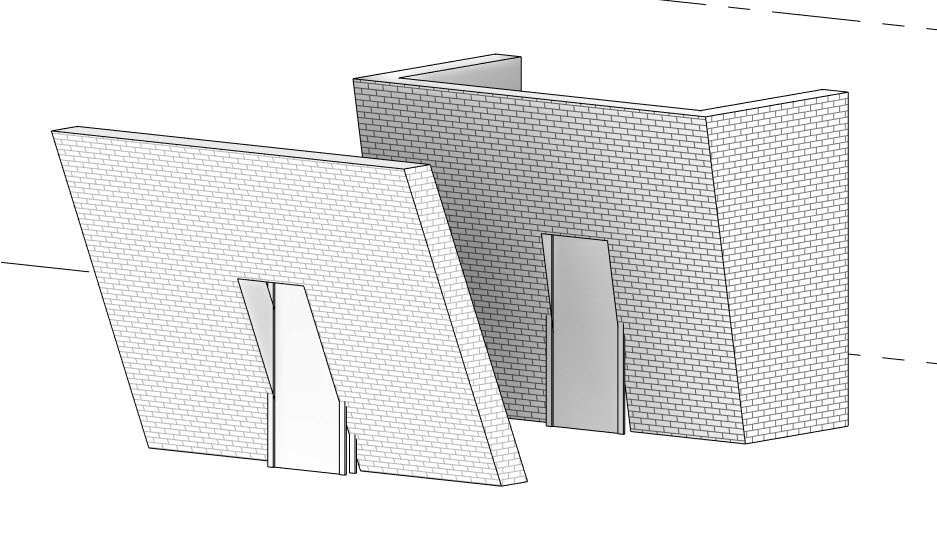
For BIM Chapters updates, follow @DanStine_MN on Twitter or connect on LinkedIn